Practicum 7: Ontologies and Querying#
Practicum date: Tuesday, March 24, 2026, 23:59
Course: RO47014 Knowledge Representation and Symbolic Reasoning, TU Delft, CoR
Instructors: Joris Sijs, email: j.sijs@tudelft.nl
This practicum is to get hands-on experience with knowledge bases suitable for robotics, in which the knowledge is structured via an ontology. We expect it will take you roughly 2 hours for exercises 1 and 2. Then, in case there is time, you may choose to continue with exercise 3 or exercise 4.
Preparation#
Tools: TypeDB (core of the database’s server and the IDE studio) is needed to manage the ontology of the knowledge base and the instances in this knowledge base. Note that the ontological structure of the knowledge base is defined by a schema-file (starting with ‘define’ and having a .tql extension), while the actual instances are defined by a data-file (starting with ‘insert’ and having a .tql extension).
There are two programs that you will need to install, these are TypeDB Server, being the actual database with a database-server, and TypeDB Studio, being the IDE or your development interface connecting to the server as a client. You will install these program and setup a working space.
optional: Installing TypeDB on your local computer#
Attention 1
TypeDB Server and TypeDB Studio are already installed in the singularity image used in this course. Therefore, if you plan to use TypeDB in the singularity image, you may skip this section.
However, since it is easy to install both in linux, Windows or Mac, you could also choose to install it natively in your machine following the instructions presented in the appendix, just be sure to use the correct TypeDB version (which is 2.28 for this course).
Setting up your workspace for this practicum#
TypeDB makes use of a schema-file and of a data-file. The schema file is where you define the ontology, while the data-file is where you define the instances, or individuals. In this practicum you will mainly work in the data-file. We have prepared both files for you as a download. Also, you will need to run the database and the server of the TypeDB database itself.
Download the ontology from Brightspace, called
schema_floorplan.tqland put it in some project folder.Download the data file
data_floorplan.tqlfrom Brightspace and place it in the same project folder.Start the TypeDB Server in a terminal:
In the singularity image, run the command:
typedb server --storage.data $HOME/krr_ws/typedb/dataIn your computer, open a terminal and run the command:
typedb server(Linux), or./typedb server(windows).
Next step is to open TypeDB-Studio:
In the singularity image, run the command:
typedb-studioWith a local installation, you can open it checking your installed apps and clicking on TypeDB’s Studio icon.
Then, in TypeDB Studio, at the top-right corner there is a button for making the connection to the TypeDB Server, that you have started the previous step. The default address that you should connect to is “localhost:1729”. With this address hit the ‘connect’ button.
When the status mentions status connected, then you are prepared for the practicum of this week
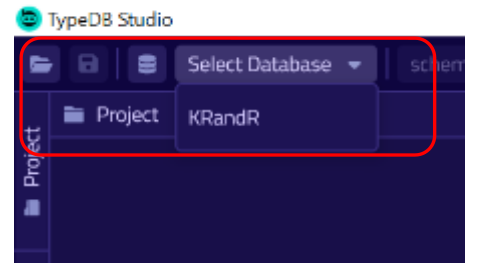
Create a new Database, e.g.,
KRandR, and open that DatabaseOpen the project folder from within TypeDB Studio, i.e., the location where you stored the .tql files.
Double-Click on the
schema_floorplan.tqlanddata_floorplan.tqlWrite the schema (to the database) and hit commit, i.e.:
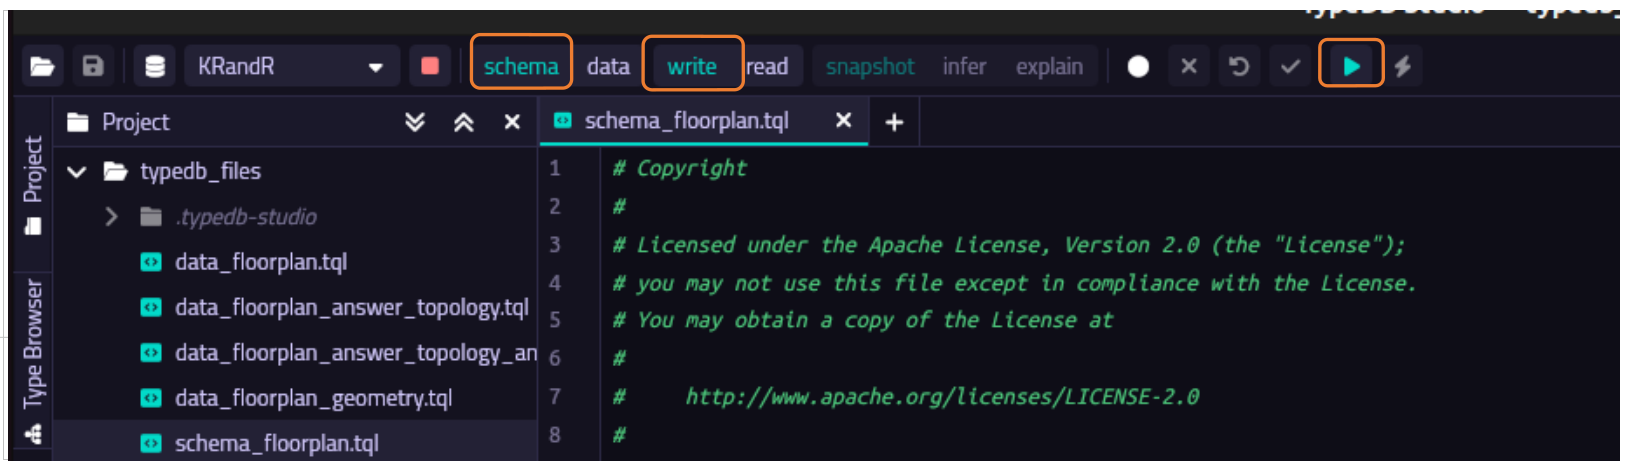
Click on the tab linked to
schema_floorplan.tql.Click the ‘schema’ toggle and ‘write’ toggle.
Click the ‘play’ button, which will write the schema into the ‘KRandR’ Database. These will write the structure of abstract concepts into the Database, i.e., the ontology or the A-box if it were OWL.
Click the ‘commit’ button (the checkbox on the left of the play-button)
Read some common mistakes when creating code (the next page shows a code-example)
After the introduction of a new concept, either with
define,insertormatch, you state;. Only if you are not finished with that concept, e.g., when you also introduce one of its attributes, then you use the,and put the;after all attributes were introduced.Putting the
$sign in front of a character or word implies that it is a variable.For schema use
defineandsub,ownsandplaysfor a subclass, property or role. For data, introduced later in the assignment, useinsertandisaandhasfor a class or property instance. To insert a relation between two variables$aand$b, you can useinsert (role_a: $a, role_b; $b) isa relation.
Assignment#
Description#
In this assignment you will create a knowledge base, or a graph database, containing all the information that our (fictious) robot needs to go from one room to another.
Our robot will run the TypeDB Server.
Generic data-objects and their structure are defined in schema_floorplan.tql, while actual data-objects are defined in data_floorplan.tql that you are developing in this practicum.
TypeDB has a user-friendly querying language called TypeQL, see also the documentation on Introduction | TypeQL (please note you read the documentation of version 2.x and NOT 3.x).
TypeQL is used for both defining schema- and the data-files as well as for direct querying of the database to search for results. Some typical queries of this practicum are presented, next.
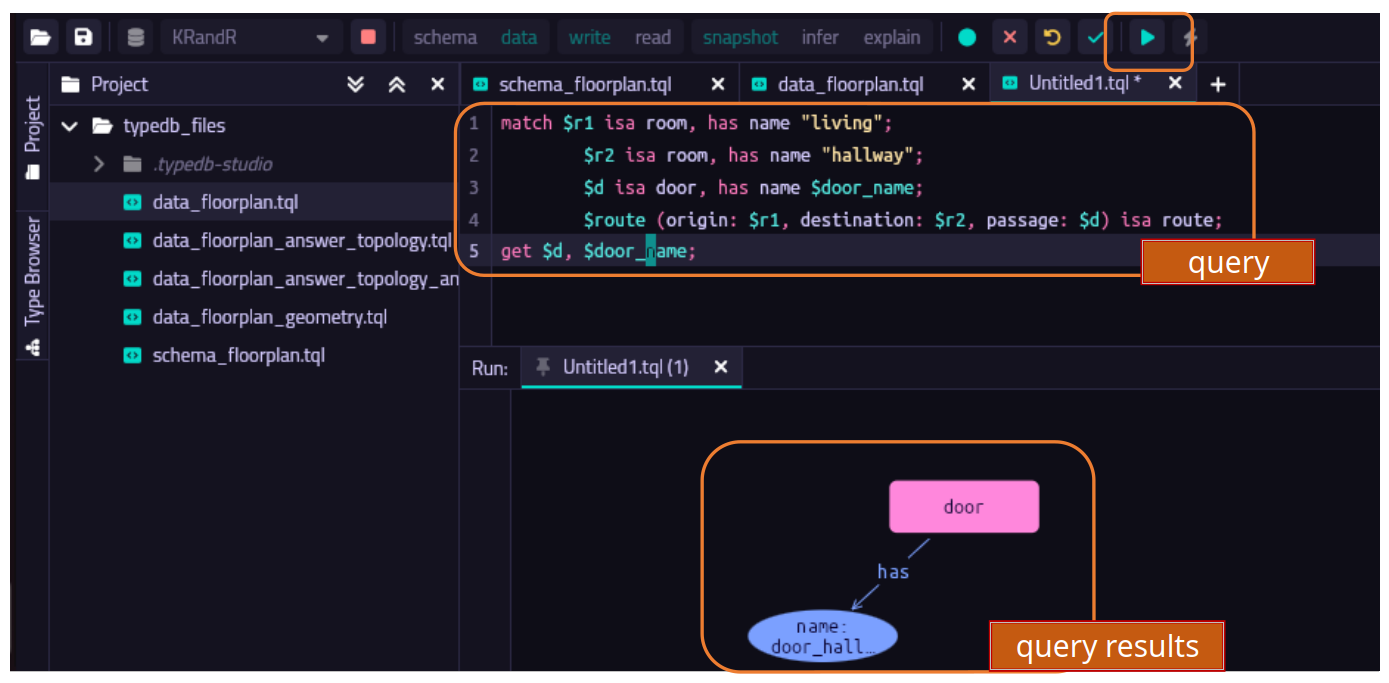
A query to get the door instance and the door name between 2 rooms.
match $s1 isa room, has name "living_room";
$s2 isa room, has name "kitchen";
$d isa door, has name $door_name;
$r (origin: $s1, destination: $s2, passage: $d) isa route;
get	$d, $door_name;
A query to get the points (x1, y1) and (x2, y2) that define the opening of the queried door, and where the position is defined in the local frame of a room (which could be equal to the global frame).
match $d isa door, has name "door_kitchen_to_living";
$r isa room, has name "living_room";
$vec isa vector;
(form: $d, concept: $vec) isa taking_form;
(start: $p1, end: $p2, line_segment: $vec) isa directed_link;
(enclosed: $r, border: $pol) isa enclosing;
(hull: $pol, element: $vec) isa set;
$local isa local_origin;
(from: $local, to: $p1) isa positioning, has lin_x $x1, has lin_y $y1;
(from: $local, to: $p2) isa positioning, has lin_x $x2, has lin_y $y2;
get	$x1, $y1, $x2, $y2;
Exercise 1#
1-A#
Review the design-patterns of the schema_floorplan.tql as provided in the appendix as well as the topological and geometrical information of this floor plan that is also provided into the appendix.
As an exercise, load the data-file into the database, data_floorplan.tql, which is done similarly as to loading the schema file, yet writing data instead of schema, i.e.,
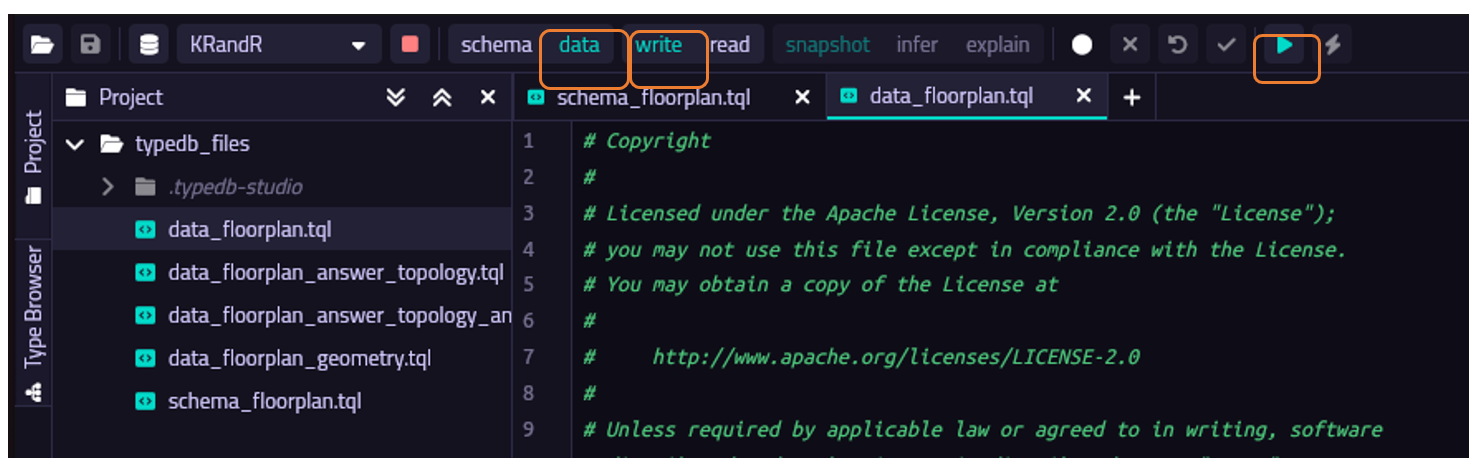
Click on the tab linked to
data_floorplan.tql.Click the ‘data’ toggle and ‘write’ toggle.
Click the ‘play’ button, which will write the data into the
KRandRDatabase. These are the instances of the Database, i.e., the individuals or T-box if it were OWL.Click the ‘commit’ button (the checkbox on the left of the play-button)
Do not yet commit you data, as you will need to change it in the coming exercises. Still, you may query the data, as TypeDB has a local instance of the database that includes both the schema that you have already loaded (and committed) as well as the data-file you just loaded.
1-B#
Then, now that we have data in our local database, we may query the data. To do so, open an empty section next to the schema_floorplan.tql and data_floorplan.tql by clicking on the + sign next to tab of those files.
In this empty section, copy paste the above query to obtain the door name.
Hitting the ‘play’ button as before will now give you the results of the query, i.e., all the doors and names present in this local instance of the database.
Exercise 2#
2-A#
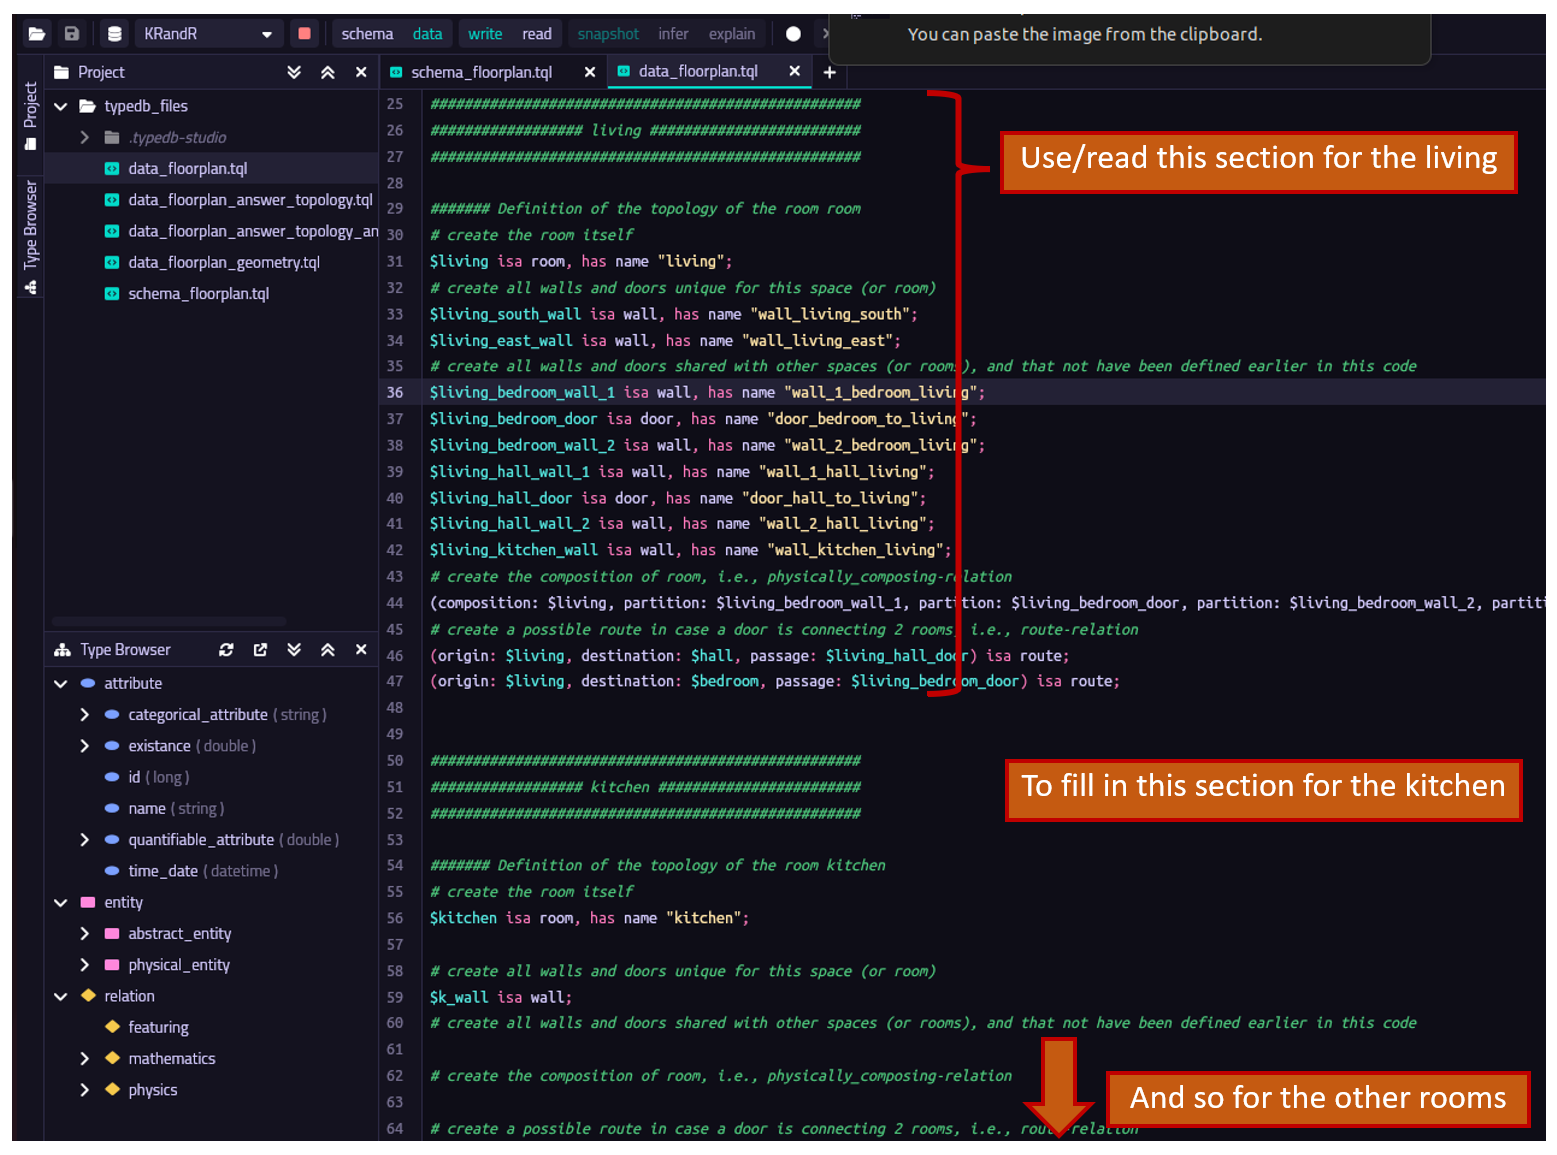
Create (add) the instances of the floorplan in the data_floorplan.tql that correspond to the topology, i.e., all buildings, rooms, doors, walls and artifacts or humans with some name, as well as the relations between them, such as composing (physically or spatially), route, locating.
You may follow the comments of this file.
2-B#
You can double-check your implementation by querying all rooms in the knowledge-base: match $r isa room; fetch $r: name; or match $r isa room, has name $name; get $name;.
You need to write that data-file to the database (and hit commit).
2-C#
Run the query match $r isa route; get $r; which would result in all the possible routes that are inside your knowledge base.
Try to interpret the results and also try to create a query that only results in the one route between the living room and the hallway.
Is your knowledge base able to provide the door that needs to be passed by the robot?
In case there is time, then you may choose to either continue with exercise 3, in which you will do similar efforts as to exercise 2 but then related to the geometry of the floorplan, i.e., the polygons, edges, vertices and origins. You may also continue with exercise 4, in which you will adjust the schema file, i.e., the ontology, by adding logical rules for automatic inference.
For both exercises you will need to download and new datafile, i.e., data_floorplan_geometry.tql, which is an example of all instances that define the geometry of the living room.
Exercise 3#
3-A#
Create (add) the instances of the floorplan in the data_floorplan_geometry.tql that correspond to the geometry, i.e., all polygons, vectors, points and origin (either local or global), as well as the relations between them and between the topological concepts, such as enclosed, taking_form, collection, positioning.
Note that the positioning relations have attributes that define the actual coordinates of the point that is linked by the positioning relation, i.e., the attributes lin_x, lin_y, lin_z, rot_x, rot_y and rot_z.
Make a decision on whether every room has its own local origin, and the other points in the room relate to that local origin, or that there is only one global origin and all points of any polygon are related to the global origin directly. What would be the benefit if having local origins, and what would be the drawbacks?
3-B#
Double-check your implementation by querying a door opening.
3-C#
Add the attribute accessibility to the door (it is already defined in the schema that a door may own an accessibility, which can either be the string ‘open’ or ‘close’. Now add this attribute to all the doors in the database, randomly stating that they are open or close. How should you alter your query to only result in the route where the door is open?
3-D#
Also, think of a query by which you would gather all the points of the polygon that characterizes, for example, the living.
Exercise 4#
4-A#
In case there is time, then you may also continue with developing your own logical rules in this database.
For that you will need to open the ontology itself, i.e., the schema_floorplan.tql.
There, all at the bottom of the file, you may create your own rule that will be automatically processed by the database on case you are querying.
For that you need to allow the database to apply inference by clicking on the bottom in the top of Type-DB studio. As an example, let’s create you first rule (see also here: Rules | TypeQL ):
Rule rule-label:
when{
    ## the condition
    }then{
    ## the conclusion
};
Within the when you would create the condition as if you were writing a match-query for the database, just like you did in the first part of this assignment. In the then you will state the thing that you want to instantiate in your database, for example
Rule avoid_wall:
when{
    $some_wall isa wall;
    $050_distance isa approaching_distance, has meter 0.5;
    }then{
    (feature: $050_distance, subject: $some_wall) isa featuring;
};
This rule will create an instance of a featuring relation in your database for every wall, indicating that the wall may be approached up to 0.5 meter. Which is useful in case the robot needs to ensure some distance to walls. Now, your last assignment is to extend this rule such that walls in different rooms may be approached at different distances. So, for example, the robot may approach walls in the hall up to 50 cm, while in the patio up to 75 cm.
Appendix A: Floorplan#

Appendix B: Taxonomy and design patters of the ontology#
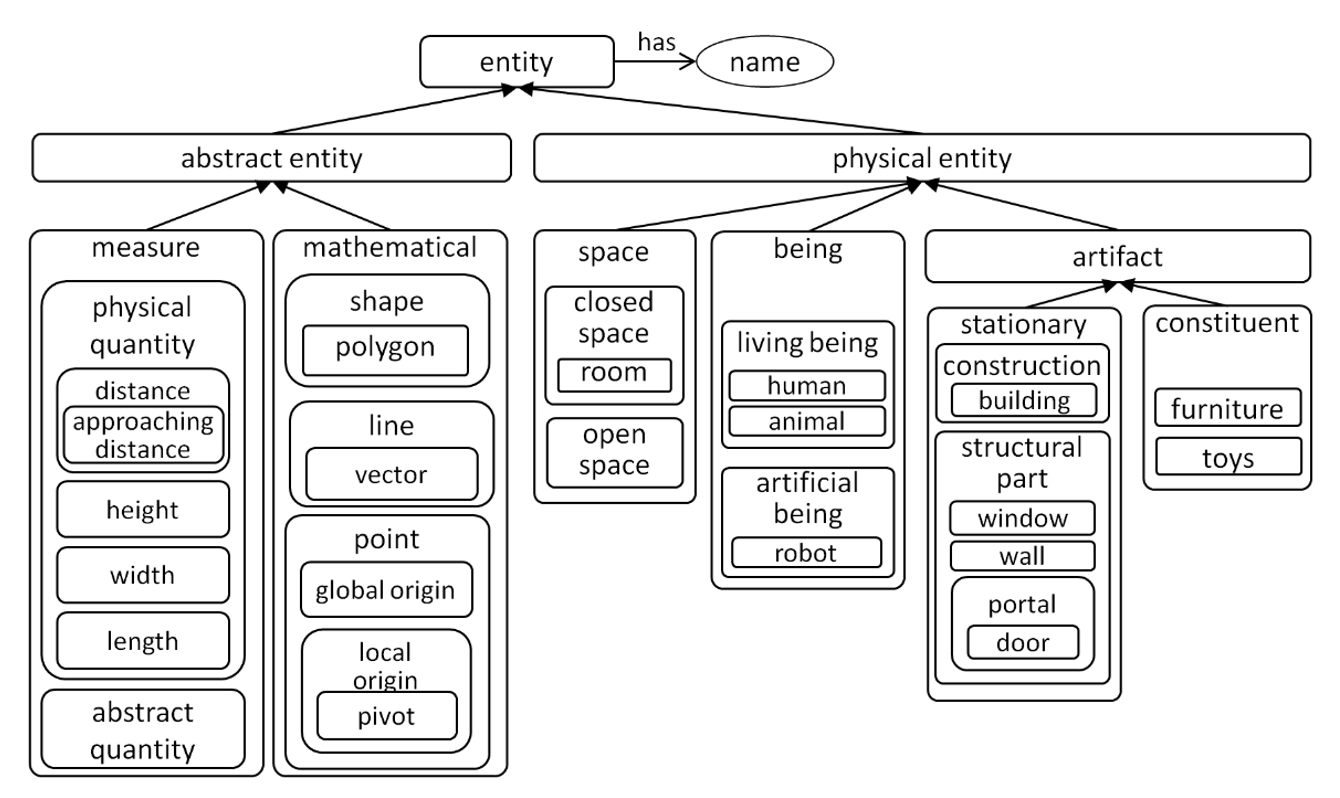
Taxonomy of all the entities in the ontology#
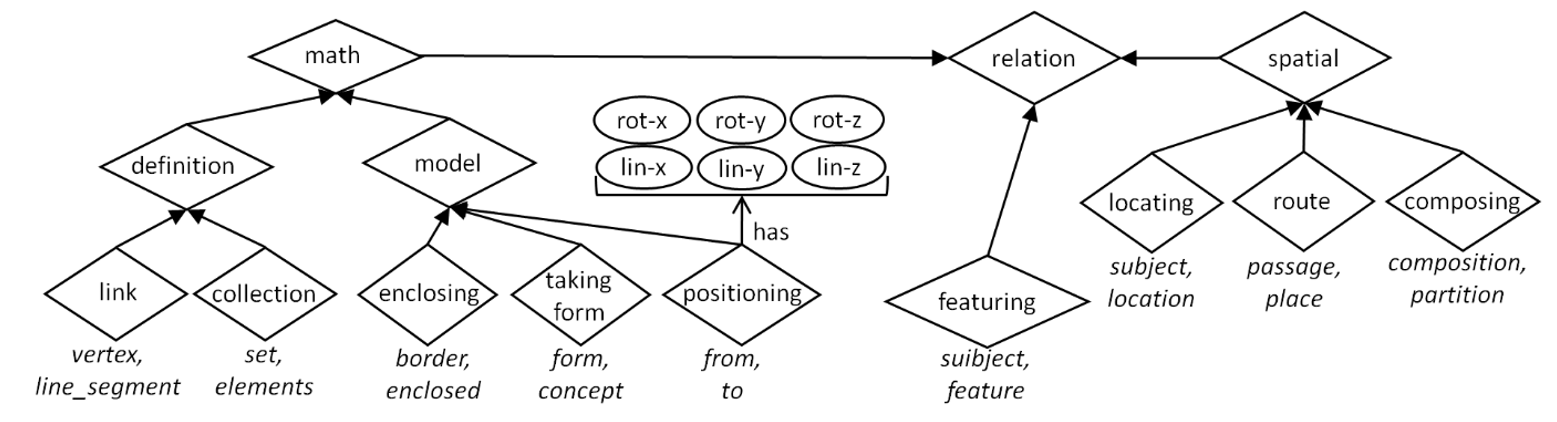
Taxonomy of all the relation in the ontology#
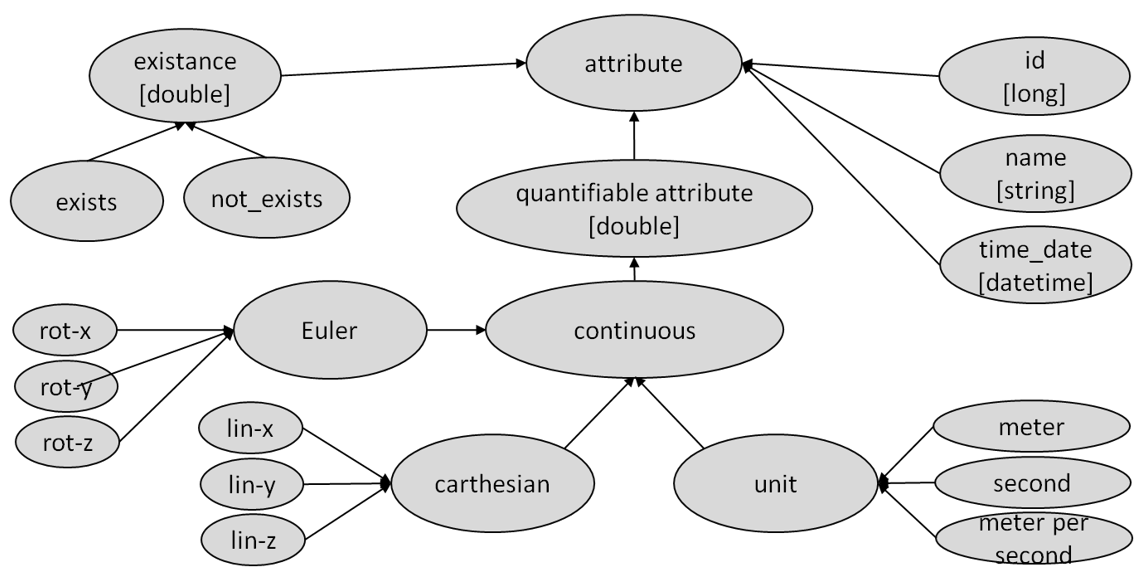
Taxonomy of all the attributes in the ontology#
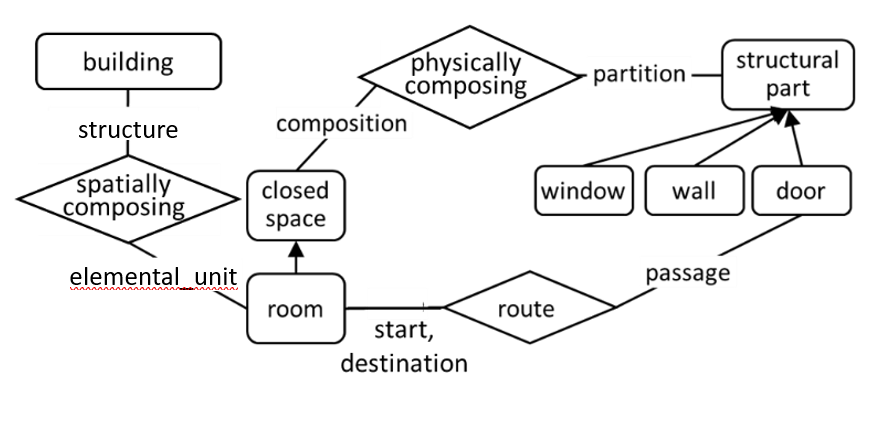
Design pattern of a building, room and structural parts#
Design-pattern of a building, rooms and structural parts, such as a wall, window and door.
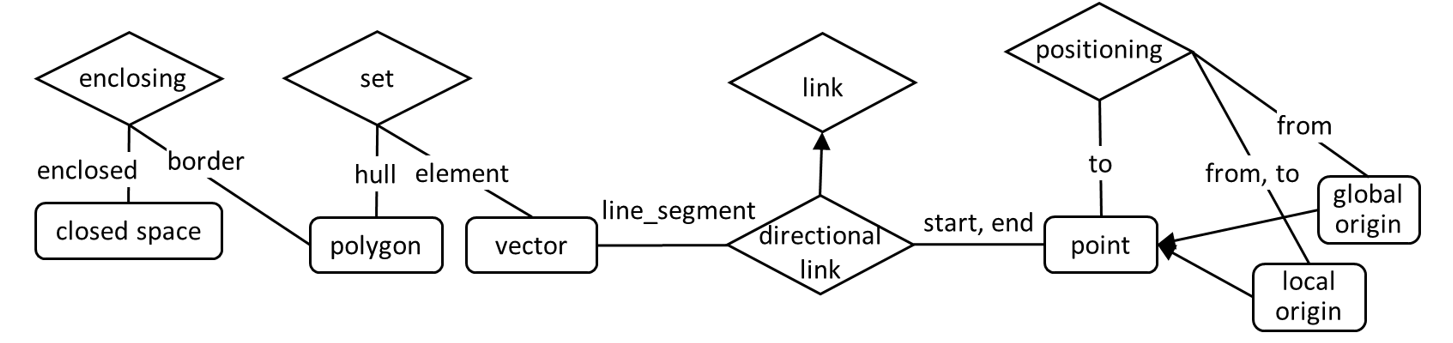
Design pattern of a closed-space, a polygon, vectors and points#
Design-pattern of a closed-space, a polygon, vectors and points, such as global or a local origin that are linked to a positioning relation. Also the locating relation is depicted for the topological information of a being that is located in a room.
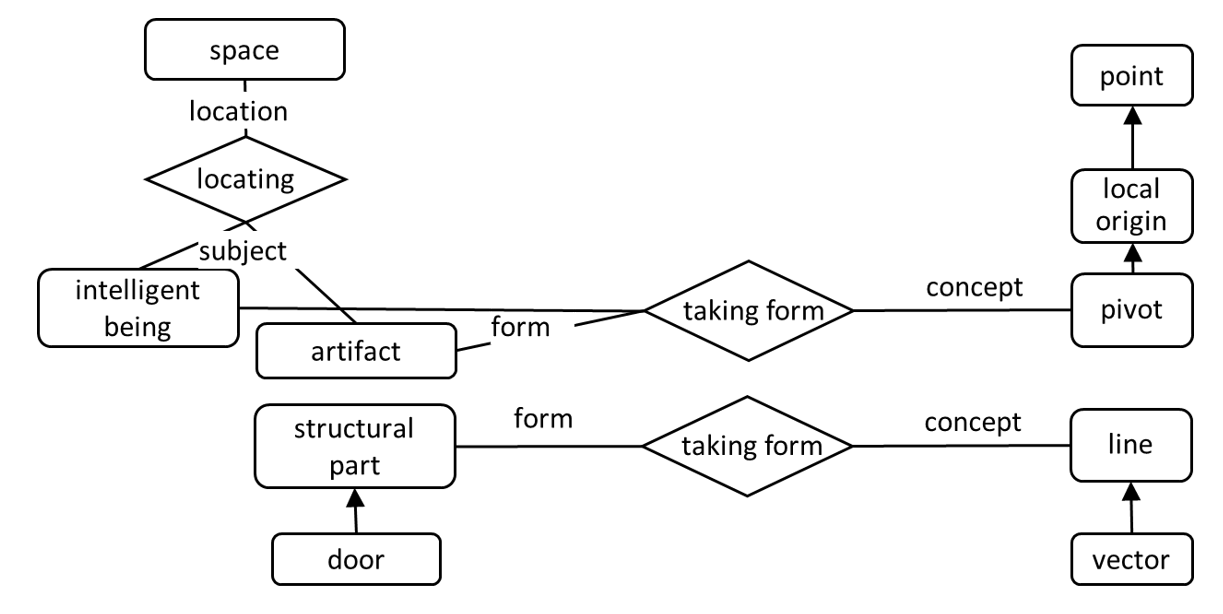
Design pattern of the locating relation and of the taking_form relation#
Design pattern of the locating relation and of the taking_form relation between something physical and something mathematical.
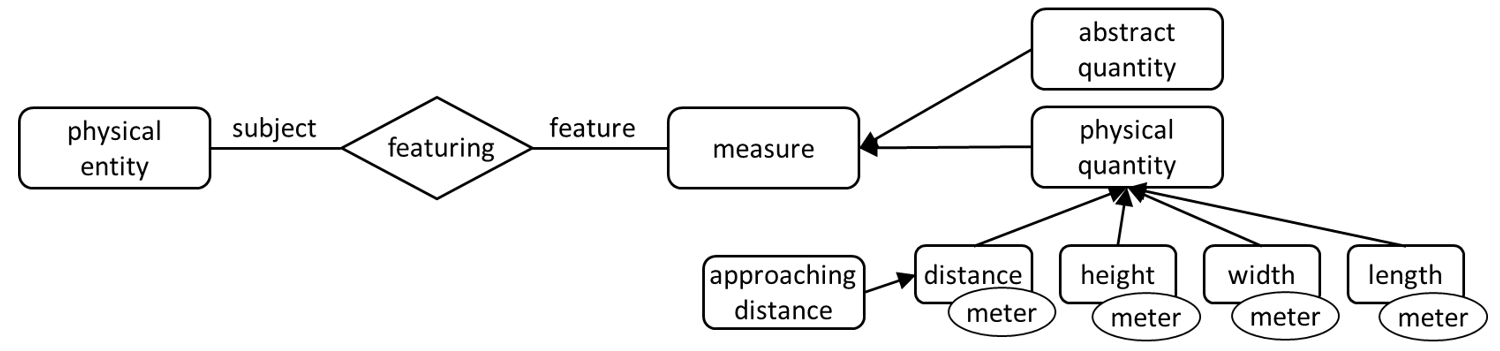
Design pattern for the featuring relation#
Design pattern for the featuring relation, by which one could introduce particular features that describe a physical entity, such as an artifact (building, wall, door, etc.), or an intelligent being (human, animal, etc.)
Appendix C: Installing TypeDB in your local computer#
Attention 2 Do not try to run the installation below within the singularity shell. This cannot be done as your sinngularity image is read-only.
Install TypeDB locally in Linux:#
A typical installation on an Ubuntu 22.04 looks as follows:
If not present, then install Java’s Open JDK (sudo apt install default-jdk)
Install TypeDB Server (which is adjusted from this link to install the right version)
Open a terminal and run
sudo apt install software-properties-common apt-transport-https gpg
gpg --keyserver hkp://keyserver.ubuntu.com:80 --recv-key 17507562824cfdcc
gpg --export 17507562824cfdcc | sudo tee /etc/apt/trusted.gpg.d/typedb.gpg > /dev/null
echo "deb https://repo.typedb.com/public/public-release/deb/ubuntu trusty main" | sudo tee /etc/apt/sources.list.d/typedb.list > /dev/null
sudo apt update
sudo apt install typedb=2.28.3
After installation run
typedb serverto start the TypeDB Server (and CTRL-C to close it).Install TypeDB Studio
Download the proper version using this link
Then install TypeDB Studio by opening a terminal at the location of the above download and run
sudo dpkg -i typedb-studio-linux-x86_64-2.28.6.deb
Install TypeDB locally Windows or Mac:#
You are on your own, although you may find the following instructions useful:
Install Java JDK from here
Install TypeDB Server
Download the zipfile from cloudsmith
Unzip the file and move to file to some sensible location, e.g.,
C:\Users\<name>\typedbOpen a terminal, cd into the folder you just extracted and run the command
start typedb server, or./typedb server. This will start the TypeDB Server. Press CTRL-C to close it.Install TypeDB Studio by downloading and install the executable from cloudsmith