KRR Setup Instructions#
Practicum 1.1: Simulation Installation & Exploration
Knowledge Representation & Symbolic Reasoning
Practicum 1.1: Simulation Installation & Exploration
Practicum date:
Course: RO47014 Knowledge Representation and Symbolic Reasoning, TU Delft, CoR
This practicum will help you install the software that we use for the course, especially a ROS 2 simulation with a Mirte Master robot for the Course Project. The setup is based on a Singularity image similar to the one used for Robot Software Practicals.
In addition to the Singularity image, extra code is downloaded from online git repositories. After the installation instructions, this document guides you through exploring the robot simulation that you have to use for your project.
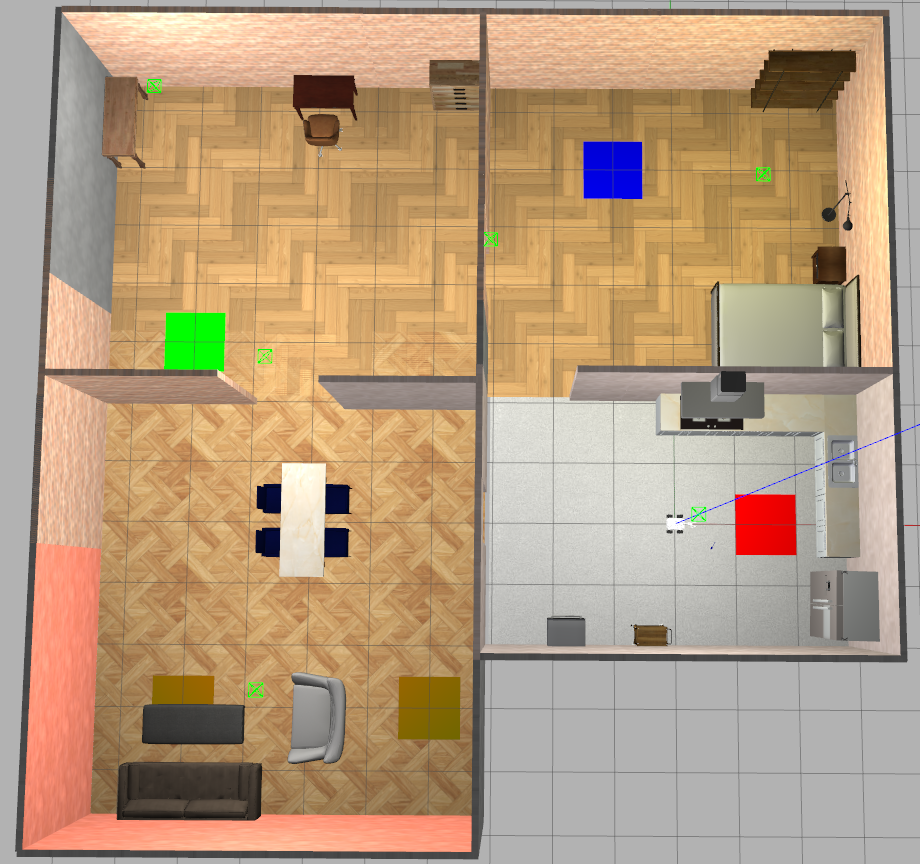
The idea of the whole course is to help you develop an architecture and solution for a real-world application task, such as tidying up an apartment in the RoboCup@Home competition. A topview of the apartment for this competition is presented in the figure below. Week by week, we will provide you with tools and methods on how to make a plan for such a task and how to execute it.
You can check the solutions of some of last year’s groups, like Group 12 and Group 13.
The final task and project have three subtasks that will be discussed in more detail later. However, for now, let’s become more familiar with the simulation environment and singularity.
You do not need to deliver anything about this practicum.
Pre-requisites#
This course makes use of a Singularity container environment to run all software. The Singularity image provided for RO47014 Knowledge Representation and Symbolic Reasoning (KRR in short) is similar to what you may have used in Robot Software Practicals (RSP). As in RSP, we strongly recommend using a native installation of Ubuntu (22.04 LTS or 24.04 LTS). While a virtual machine can be used, it is not preferred due to potential limitations in performance and hardware access.
If you do not have the RSP setup available, you should follow the installation instructions in the document setup_manual_rsp_2025_2026.pdf on BrightSpace. If you want to use the VM, follow only chapter 2(Virtual Machines). If you have a native installation, only follow chapter 1(If you already have Linux). Additional installation guidance for Singularity can also be found in the official documentation at:
https://docs.sylabs.io/guides/4.3/user-guide/quick_start.html
After installing Singularity, verify your installation by running the following command in a terminal:
singularity --version
A correct installation should produce an output similar to:
singularity-ce version 4.3.1-XXX
Important: You must use Singularity version 4.3.1 or newer, but strictly below 5.x, to ensure compatibility with the course environment.
Setup the KRR environment on your computer#
To start working with the KRR software stack, you first need to create a ROS workspace for KRR in your $HOME folder in your machine (either your native Linux, dual boot, or a virtual machine), download the course Singularity image, download all the required software, and build the workspace.
Attention 1
Although ROS is mentioned throughout the assignments, note that the actual version used by KRR is ROS 2 Humble.
Create a ROS workspace#
First, create your own ROS 2 workspace where you will develop your code.
mkdir -p ~/krr_ws/src   # create a directory for the krr workspace
cd ~/krr_ws             # navigate to the krr workspace source directory
touch .colcon_root      # this is only needed for colcon-top-level-workspace
Download course Singularity image#
You can download the Singularity image for the KRR course using this command:
# Change the tag(v3) when instructed to download a newer image:
singularity pull -F ro47014_humble_v3.sif oras://registry.tudelft.nl/cor_ro47014_krr_image/singularity_image:v3
Attention 2
It’s best to download the singularity images to a standard known location, like~/Downloads. When cleaning your workspace, you won’t accidentally delete the images.
You can download an update by changing the tag to a newer version (vN, when instructed to do so). To get the version of your image, run:
singularity exec ro47014_humble_v3.sif cat /version.txt`
Building the KRR course packages#
Attention 3
The KRR packages are installed in /krr/krr_base_ws/ and not under the default ROS installation path. Please do not source/opt/ros/humble/setup.bash, as this may override the required environment. The KRR base workspace is already sourced in.bashrc. This note is provided to avoid confusion and ensure a consistent setup.
Important
All commands from here are run in a Singularity shell session if not stated otherwise! So, first open a Singularity shell session, for example, from the directory where you have downloaded the course image:
singularity shell -p ro47014_humble_v3.sif
To build the KRR base workspace:
source /krr/krr_base_ws/install/setup.bash
cd ~/krr_ws/
colcon build --symlink-install
source install/setup.bash
You should now have a log, build and install directory besides an empty src directory. After this you can just source your own workspace: source ~/krr_ws/install/setup.bash.
You should also have a .colcon_root file for rhaschke/colcon-top-level-workspace.
Using the KRR setup with Singularity#
To use the KRR base workspace with Singularity, you simply need to start the Singularity image as follows:
cd ~/krr_ws   # navigate to the krr workspace source directory
singularity shell -p ro47014_humble_v3.sif
Important
If you are running Ubuntu (or another Linux distribution) natively (no VM) and have an NVIDIA GPU and have installed the official NVIDIA drivers (via Additional Drivers on Ubuntu for instance), you can enable GPU acceleration. See the GPU acceleration section for more information.
Then, every time you want to use the KRR setup, simply start the Singularity image and run what you need in the Singularity shell.
Simulation exercises#
The following exercises are designed to familiarize you with the simulation and how to work with it.
Important
The following instructions assume that you are working inside a Singularity shell session. Remember, the command to start it is:
singularity shell -p ro47014_humble_v3.sifYou need to source your own workspace
setup.bashfile of your ROS2 workspace every time you open a new terminal and run a new command!
Launch the Mirte simulation#
First, start the singularity image as explained above.
Then, within the singularity shell, source the KRR workspace:
source /krr/krr_base_ws/install/setup.bash
# or source ~/krr_ws/install/setup.bash if you already made your own workspace.
Now, you can launch the simulation with the following command:
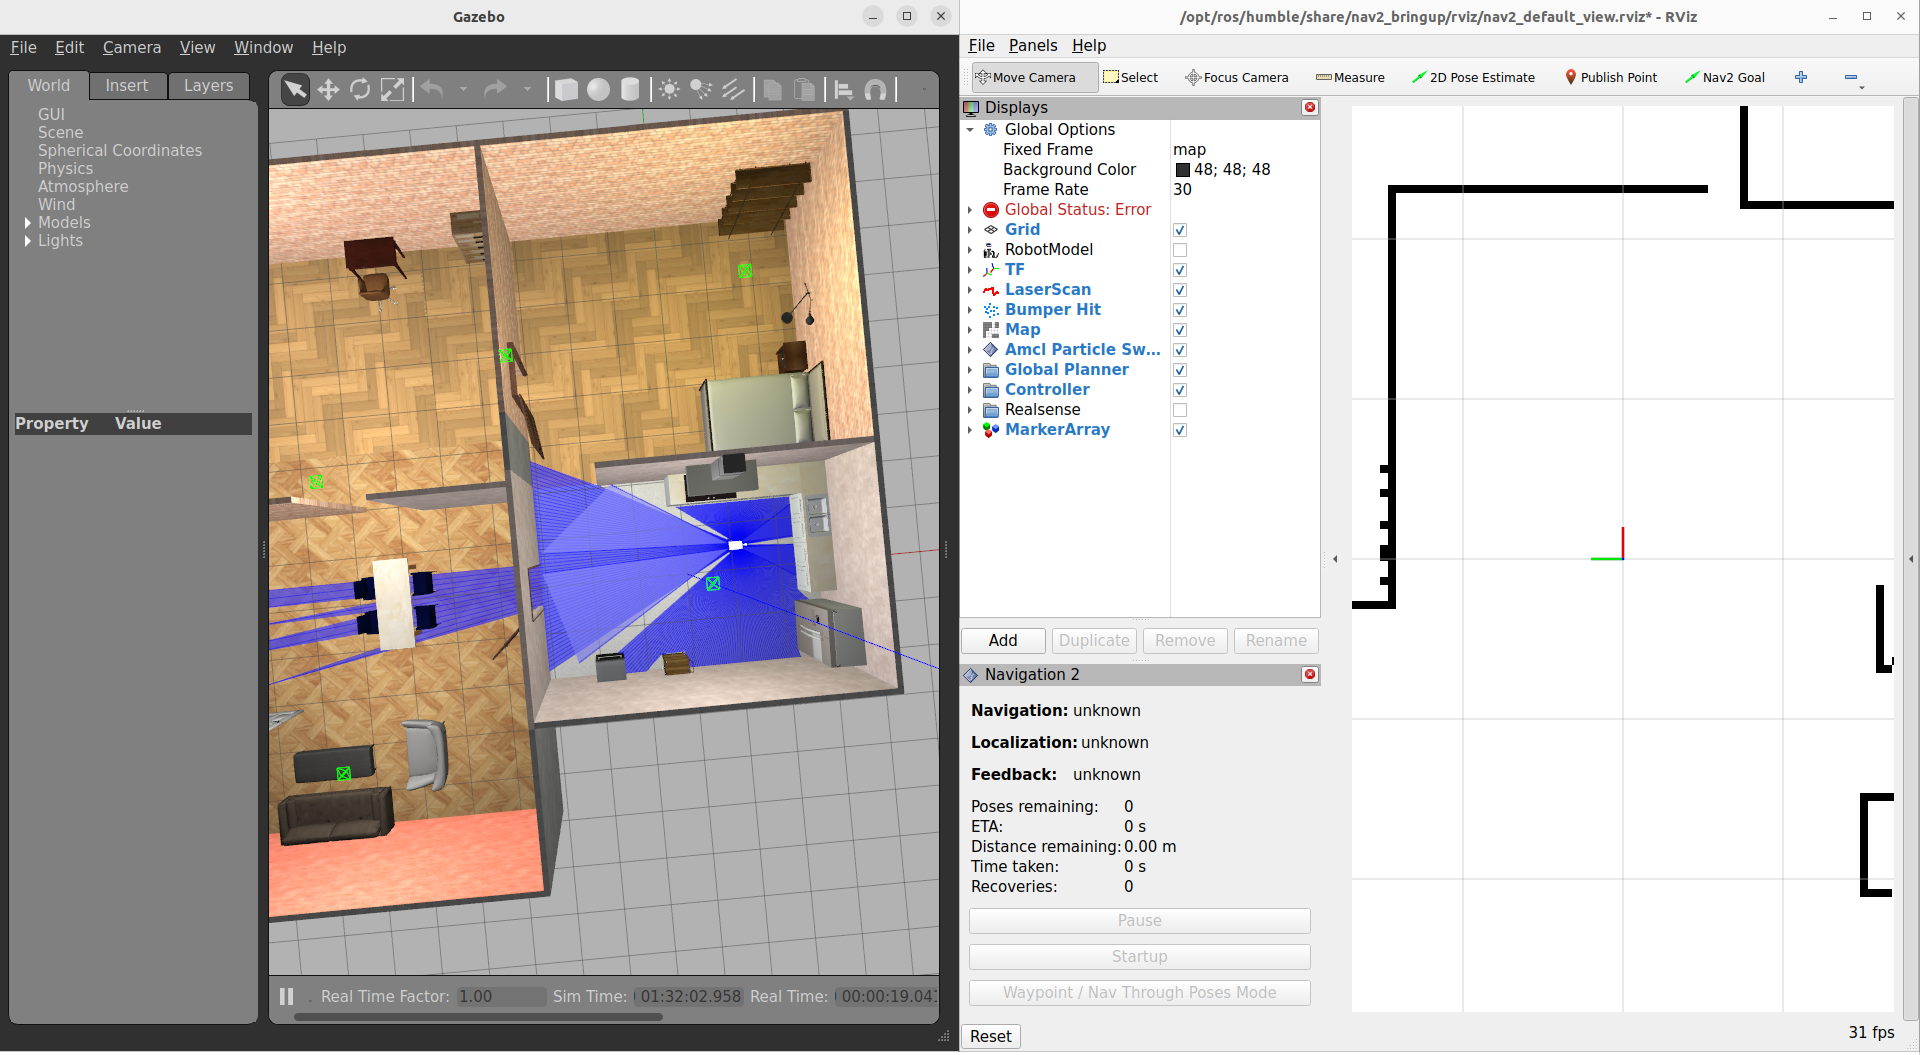
ros2 launch mirte_gazebo gazebo_mirte_master_navigation.launch.py
This should launch Gazebo and RViz, and you should see something similar to this:
Moving Mirte#
There are multiple ways to make Mirte navigate through the map. The simplest option is to control Mirte yourself with your keyboard, a second option is to use RViz to send navigation goals to MIRTE, and a third option is to send navigation goals to Mirte from a ROS node.
Keyboard teleoperation#
Drive Mirte around with your keyboard keys by running in another terminal:
ros2 run teleop_twist_keyboard teleop_twist_keyboard --ros-args --remap cmd_vel:=/mirte_base_controller/cmd_vel_unstamped
After running the above command you will see some instructions on how you may command the robot.
Controlling the arm and gripper#
Moving the robotic arm and gripper of the Mirte robot can be done in various different ways. For now, let us move the arm and gripper by publishing messages with the desired joint positions to the arm and gripper controllers. In the following weeks, you will learn to move/control the arm with action servers to enable a more high-level manipulation of the arm and gripper. For example, by performing a “close gripper” action instead of sending the exact joint positions. Stay tuned!
The following commands will publish the joints of the robot and gripper on specific topics that are avialable in the ROS2 system that you have launched. After publishing on those topics the the arm and gripper shall move accordingly.
Moving arm up:
ros2 topic pub --once /mirte_arm_controller/joint_trajectory trajectory_msgs/msg/JointTrajectory "{joint_names: ['arm_Rot_joint', 'arm_Shoulder_joint', 'arm_Elbow_joint', 'arm_Wrist_joint'], points: [{positions: [0.0, 0.0, -1.56, 1.56], time_from_start:{ sec: 3, nanosec: 0}}]}"
Moving arm down:
ros2 topic pub --once /mirte_arm_controller/joint_trajectory trajectory_msgs/msg/JointTrajectory "{joint_names: ['arm_Rot_joint', 'arm_Shoulder_joint', 'arm_Elbow_joint', 'arm_Wrist_joint'], points: [{positions: [0.0, -1.56, -1.56, 1.56], time_from_start:{ sec: 3, nanosec: 0}}]}"
Close gripper:
ros2 topic pub --once /mirte_gripper_controller/joint_trajectory trajectory_msgs/msg/JointTrajectory "{joint_names: ['Gripper_joint'], points: [{positions: [0.1], time_from_start:{ sec: 1, nanosec: 0}}]}"
Open gripper:
ros2 topic pub --once /mirte_gripper_controller/joint_trajectory trajectory_msgs/msg/JointTrajectory "{joint_names: ['Gripper_joint'], points: [{positions: [-0.1], time_from_start:{ sec: 1, nanosec: 0}}]}"
Note: If it doesn’t work the first time you publish a message, try publishing again.
Contributing#
If you want to contribute to a more realistic and interesting simulation you are more than welcome! If you find bugs or want to suggest new features, please create an issue in the krr_bringup GitHub repo or in the repo related to the issue you faced. If you fix bugs or add new features, open a Pull Request on GitHub with your changes. The packages maintained by us are:
You can also use the discussion tab in the krr_bringup repo to ask questions and start discussions.
Appendix#
GPU acceleration#
If you are running native Ubuntu (without a Virtual Machine) and you have an NVIDIA GPU and are using the official NVIDIA drivers with it, you can use GPU acceleration to have a smoother simulation.
Your Ubuntu host needs to use X or have Xwayland installed, this is often the case with Ubuntu 22.04 and 24.04. Other modern Linux distributions also tend to have Xwayland available.
You need to install the Nvidia Container Toolkit.
Then you need to configure Singularity:
edit two entries in the singularity.conf file, which should be at /etc/singularity/singularity.conf (note: editing this file requires sudo):
Enable NVIDIA Container CLI:
set
use nvidia-container-cli = yes
Set the path to the
nvidia-container-clibinary (the default value is empty):nvidia-container-cli path = /usr/bin/nvidia-container-cli
The following command will launch a fully GPU accelerated shell session:
NVIDIA_DRIVER_CAPABILITIES="graphics,utility,video,display" \
  singularity \
    shell \
      --nvccli \
      -B $XAUTHORITY \
      /path/to/your_image.sif
Note
The additional -B $XAUTHORITY argument is needed to allow programs inside the Singularity shell session access to X or Xwayland.
It’s not strictly needed to enable GPU acceleration, but many ROS programs with a UI will not work correctly without it.
For laptops with a dual-GPU configuration (NVIDIA Optimus or similar, such as in the TU Delft recommended laptop HP ZBook X G1i) you have to force the use of the NVIDIA GPU:
__NV_PRIME_RENDER_OFFLOAD=1 __GLX_VENDOR_LIBRARY_NAME=nvidia \
  NVIDIA_DRIVER_CAPABILITIES="graphics,utility,video,display" \
  singularity \
    shell \
      --nvccli \
      -B $XAUTHORITY \
      /path/to/your_image.sif
Note the two additional environment variables (starting with __NV and __GLX).
Obviously, using a suitably named and constructed alias would make this much more convenient.
You could consider adding something like this to your .bashrc:
alias singularity-shell-on-nvidia='__NV_PRIME_RENDER_OFFLOAD=1 __GLX_VENDOR_LIBRARY_NAME=nvidia NVIDIA_DRIVER_CAPABILITIES="graphics,utility,video,display" singularity shell --nvccli'
the command for all systems (extra variables are ignored when using normal GPU setup) would then become:
singularity-shell-on-nvidia -B $XAUTHORITY /path/to/your_image.sif